-transformed.png)

There was a time when most of the houses in Watamu had so-called makuti roofs. Even today they remain very popular. On the one hand, they give an exotic touch to a house or hotel; on the other hand, they are affordable, in particular, if local people can use their own palm leaves.
Furthermore, a makuti roof keeps the area under it cool — much better than classic roof tiles or iron sheets that transform your house into a sauna.
The house we live in used to have a makuti roof.

That was before the great fire of 1994 that burned down large parts of Watamu, starting at Watamu Beach Hotel. At that time, I was still a student in Europe, and I was even not dreaming about living one day in Kenya...

After the fire, the previous owner of our house, Mr. P, decided he did not want to have a makuti roof anymore. So, when rebuilding his house, he made a solid roof from cement tiles. To create some shade near the pool, he put a metal construction with corrugated iron sheets as the roof. That fulfilled its purpose.
When we bought the house in 2016, we decided to replace the construction at the pool. After some discussions, we opted to build a makuti roof there to create a more exotic, African environment.
That roof was ok until 2024. By that time, it was overgrown by Bougainvillea, which looked beautiful — but the makuti started to rot and it was the home of countless animals who left their droppings everywhere. So, it was time to build a new roof.


My very practical wife and I had long discussions about the new construction at the pool. She wanted to have a solid construction with columns made from concrete, plastered with coral, and a roof with rectangular wooden beams and (nice) ceramic roof tiles. This became the rare occasion in which we went my way, building a similar makuti roof as we had it, but taking into account some of the problems with this type of roof. This blog describes how we did this.
Disclaimer
I am not an architect and not an expert in building makuti roofs. This blog is not to be understood as a manual to build a makuti roof but rather as me sharing my experience. It is important to keep workplace security in mind when using contractors because you might be held liable for any accidents happening on your property. There is insurance to protect you against this risk.
What is a Makuti Roof?
“Makuti is the thatching pieces made from the naturally drying palm leaves of the Coconut palm Cocos nucifera. It is a very eco-friendly or “green” building material as it is made from leaves that are naturally wilting on the palm tree and therefore harvesting does not affect the parent plant in any way. The individual pieces (or tiles) have to be weaved first. Weaving is mainly done by women in the villages where they grow palm trees.” (https://makutiroof.wixsite.com/roofing/about).
Makuti is used similarly to ceramic tiles to construct a traditional roof using local trees, often freshly cut.

Here’s the process of making makuti:
The coconut plant leaves are harvested when they turn brown.
The leaves are soaked in water to facilitate easy folding.
Sticks are cut according to the appropriate size for the building.
The leaves are stitched over the sticks using back-stitching.
The makuti are carefully packed in bundles and stored safely.
When roofing, the makuti are first tied to the roofing structure from the bottom going upwards, to the topline of the roof using a sisal fiber. The makuti are laid down in a way that they overlap at a distance of 4 inches to avoid water dripping inside the house. (https://makutiroof.wixsite.com/roofing/about)
Materials
For the frame of a makuti roof, mangrove wood was sometimes used. This is still available everywhere in Watamu, but often it is from illegal logging, destroying the unique mangrove forests that are so important to stabilize the coast, mitigate the effects of climate change, and act as the cradle for young fish. Therefore, we used (fresh) casuarina wood from plantations for the roof construction. Except for the 6 main poles, we replaced the whole old wooden construction that was infected by woodworms.
Other materials needed included various sizes of nails, wire, and sisal strips.
The makuti we bought from a local (female) vendor, Naomi (+254 710 759590), and for the casuarina, we went directly to a plantation where we cut the stems we liked best. We bought 5500 makuti tiles, most of which we used. One tile cost 20 ksh, excluding transport for which we paid 1 ksh per makuti piece...

The bark of the trees was removed by hand.

Constructors
We used a team of local experts, led by Rama (0701 447812), who has been doing a lot of work at our house in the past and whom we know is a good, diligent, and multi-talented worker. At times, we had 4 people working simultaneously at the site.
Phase 1: Getting down the old roof
As a first step, we removed all the Bougainvillea from the old roof, cutting it in a way that it will not grow back again on the roof.

Then we dismantled the old roof construction, starting with the makuti and then taking off the old beams. This took a couple of days.


The old beams were cut into small pieces to be used as firewood. The old makuti was taken by somebody who promised to use it for composting and not just dump or burn it. I hope that is true.

With this all done, we could enter into the second phase: the erection of the new roof.
Phase 2: Erection of the new roof
The team used a traditional roof construction, with steel nails and wire to connect the beans. This lasted almost a week.

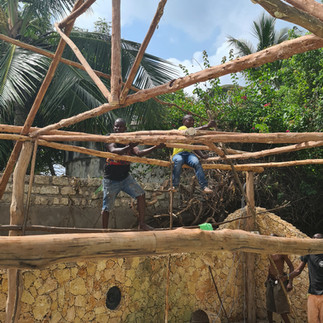


The result was a roof akin to most standard roofs all over the world, just not made from standard rectangle beams. This time, we also included a little opening in the roof. We were told that helps ventilation, as it does indeed.


After all the beams were in place, the makuti thatching started. Makutis are knotted to the beams using sisal strips that were soaked in water before.


It took around one week to thatch the whole roof and around 5000 makuti tiles were used. Tiles are laid over each other, forming a thick and waterproof roof that insulates well against the Watamu heat.
It was especially important to ensure that the roof ridge is well-thatched so that no water can come through. Some opt to cover the ridges with metal or plastic sheets. We opted not to do that for now. So far, there was no rain to prove that this was a good decision...


Final touches to the construction included installing lamps and a few fans in case it still gets too hot. These are powered by a solar system, which I have written another blog.


To be continued....
Proofreading and language editing done by Ariane L. Smith
Hey there this Report is really interesting and the result looks cool! In fact it reminds me of two examples of thatched roofs houses within my family. You might remember one of them: on the Coast of Brittany/France, property from my aunt and uncle. The other one was the House of my grandgrandparents in Harburg/Germany, which was unfortunally destroyed during WW II. Later in I will send some pictures. Cheers Rolf